![]() Five Steps to
Creating a Test for your Students
Five Steps to
Creating a Test for your Students
From the Main Menu, select
Test
Administration.
Type RoboTutor
in the Password field. Note, it is sensitive, so be sure and
capitalize the R and the T. Then click Enter to open the
Everyone9 database. Click the Create a New Test button and follow the
Help
button instructions. After setting up your new
test, click Create at the bottom of the page.
Don't worry about Advanced Features at this time. You can try it
later when you create your second test or when you return to edit this
test. It has many options for giving your test the look and feel you
want.
You should now be on the
Question List page.
To add a test question, first select a Question Type by clicking
the down arrow to the left of Add!
as shown below:

After selecting the question type, then click the Add button.
A page appears where you can enter the question. Do this for each question
in the test.
To take the test after entering all your questions, click
one of the Test links in the box shown below at the bottom of the
Question List page:
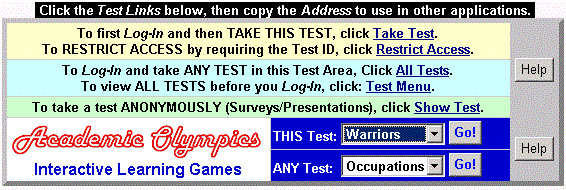
There are 5 links shown above that will all start the test you created,
each in a different format.
1 - Click the 1st one, Test,
to open just this test.
2 - Click the 2nd one, All Tests,
to produce a drop-down menu with all tests in Everyone9 (the Test Area
you selected).
3 - Click the 3rd one, Test Menu,
to display a menu that lists all the tests in Everyone9.
4 - Click the 4th one, Show Test,
to start the test without requiring the student to Log-In. This is
useful in surveys and presentations.
5- Click either Go button to the right of
the 5th one, Academic Olympic Games,
to start your test in a gaming format. This is a fun way for your
students to learn the material, but it does not keep student records.
After selecting one of these options, a page
will appear that asks for your name and password. If you have not entered
it before, any password will work. Note, it is possible to setup student
names and passwords in advance, in which case a student cannot makeup
his or her own password.
Your test will appear in a new window.
Take the test and view your score at the end. To check your personal
record, return to Step II and select one of the 5 ways for displaying
your test. A new window will open that asks for the student name and
password. Click the Access My Records button at the bottom after
entering your Name and Password.
To make a link so your students can use RoboTutor, return to Step II and select one of the 5 ways for displaying your test. A new window will open that asks for the student name and password. This is where you want your students to go. Enter the address to the page into Favorites or highlight and Copy the Address in the Address bar and make a hyperlink to it from a webpage on your school or company site. You can also access student tests by clicking the Student Tests button on the RoboTutor home page.
Short quizzes can be a powerful interactive tool for use in group presentations. It is easy to put a hyperlink in a Word or PowerPoint document.
Type Take Quiz at the bottom of the document
Highlight it
Click Insert > Hyperlink
Type the above address, but change Test1 to the password for your test.
Save it
To put a test link in a PowerPoint presentation:
Click Insert > Textbox
Type Take Quiz
Highlight it
Click Insert > Hyperlink
Type the above address, but change Test1 to the password for your test.